Beginner Quilting Series: Cutting Fabric, Pressing Fabric, and the 1/4" Seam

Welcome to the beginner quilting series that I am hosting to prepare you for the On-Point QAL!
Today in the beginner quilting series, we are talking about pressing fabric, cutting fabric, and 1/4" seams!
Firstly, you can find the other posts in this series here-
Available Cuts of Fabric
Precuts
Choosing Fabrics for a Quilt
Supplies Needed to Make a Quilt
After this post, I'll have one more post to share in my series (tomorrow)- 'Beginner Quilting Series' posts to get us ready for the On Point QAL, which starts this Friday, March 1st! That post will be on- How to make 2 at a time Half Square Triangles.
You can read more about the On Point QAL-
Solid Option Fabric Requirements and Schedule (plus lots of colored version for ideas)
Print/Scrappy Option Fabric Requirements
So, let's get into today's topics...
PRESSING
Pressing fabric is different from ironing fabric. When you are quilting, you are pressing, not ironing. The reason for this is because when you iron, you move the iron back and forth to remove the wrinkles. But, when you iron, you can slightly distort the fabric. When you are looking for accuracy with your quilt pieces, you do not want to iron them because they will distort too and then your pieces will be the wrong sizes.
Pressing fabric refers to when you put an iron down on a piece a fabric or seam, hold it there for a second or so, and then lift it directly up and off of the fabric. There is no side to side movement as there is in ironing, only up and down movement.
You can use a pressing cloth if you like so that you don't scorch the fabric. I haven't done this so I can't recommend any but you can look around and find one that has good reviews if this is something you would like to use.
CUTTING FABRIC.
To cut fabric, I typically use a 45 mm rotary cutter, a quilting ruler, and a cutting mat.
Before you start cutting, you want to make sure the selvedge edges of the fabric are lined up with each other. So, you lay the fabric out on the mat. Line up the fabric so that the rough edges are all over one of the vertical lines. Then put your ruler on that vertical line.

Then you trim off the rough edges of the fabric so that you have a very straight edge. You will measure from this straight edge to get your first cut of fabric.

In general, if I am cutting a piece that is SMALLER than the width of my ruler, I use the RULER to get the correct measurement before I cut.
If I am cutting a piece that is BIGGER than the width of my ruler, then I use the CUTTING MAT to get the correct measurement.
Here I am going to show both so you know exactly what that means.
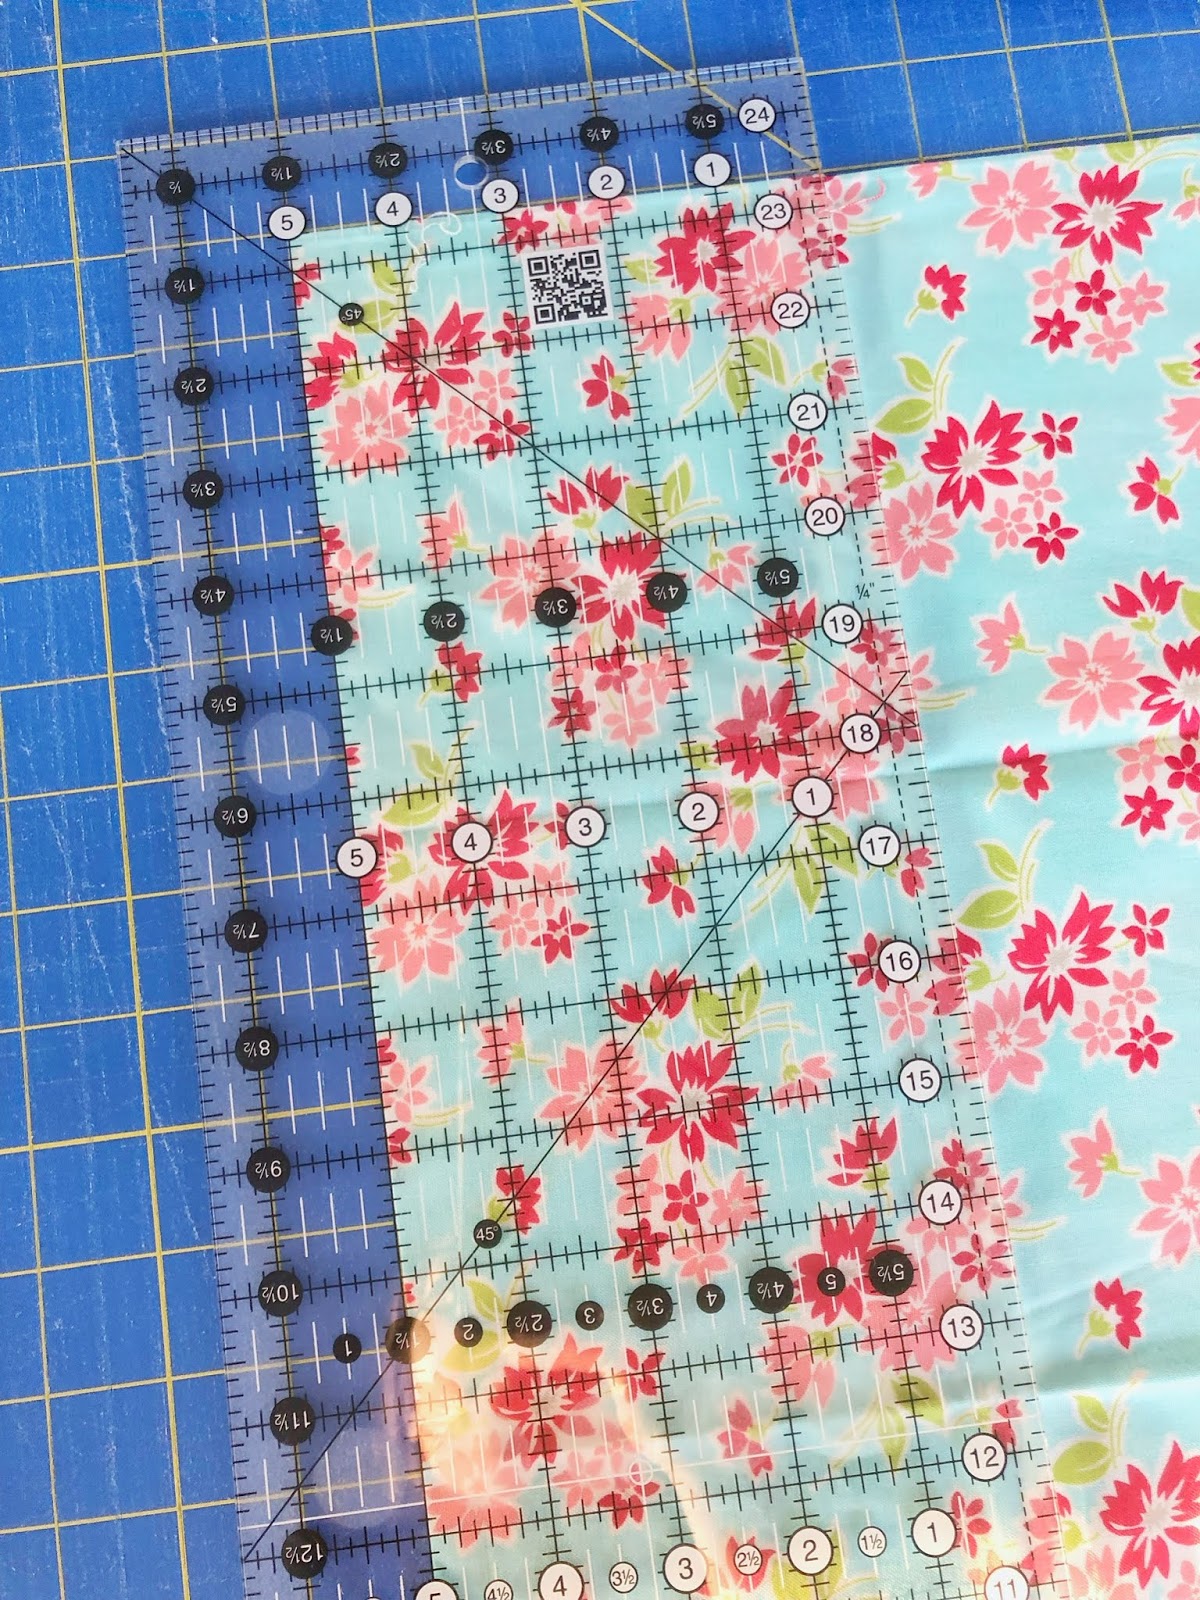
In this picture, I am cutting a 5" strip of fabric. My ruler is 6.5" wide. Since 5" is smaller than 6.5", I am going to use my ruler to measure the 5" strip. Line the 5" mark of the ruler up with the straight edge of the fabric. Then cut.
In this picture, I am cutting a 9" strip of fabric. My ruler is 6.5" wide. Since 9" is bigger than 6.5", I am going to use my cutting mat to measure the 9" strip. Line the straight edge of the fabric with one of the lines on the grid of your cutting mat. Count over 9" and line your ruler up on the appropriate grid. Then cut.

Here is a close up of my ruler placement at the top.

A few tips-
-Always be super careful with your rotary cutter. It can really hurt you. Don't rush and use caution, always.
-When you are using a long ruler like the one I use, it can move around as you cut. Apply downward pressure to hold it in place. Then, if you need to, pause the actual cutting movement, slide your hand down the length of the ruler to secure where you are going to be cutting next. Repeat if needed.
-Be as accurate as you can. You accuracy in cutting will affect the accuracy you have when you are piecing. If your pieces aren't cut the correct side, your blocks will not be the correct size and your quilt won't fit together correctly.
1/4" SEAM
Unless otherwise started, quilts are usually pieced with a 1/4" seam. That means that from the stitch line to the edge of the fabric measures 1/4".

You may have heard about a pattern mentioning a scant 1/4" seam. This means that the portion from the stitch line to the edge of the fabric is just scant (less than) of 1/4". The reasoning behind this is that the thread line will take up a portion of the 1/4" seam. So, by sewing a scant 1/4" seam, you account for the thread line and have a very accurate 1/4" seam when all is said and done.
In my patterns, I sew a standard 1/4" seam line unless specifically stated that a scant 1/4" seam is needed.
With practice, you will get better at maintaining a 1/4" seam. However, to make sure you are always accurate, you can purchase a foot that goes onto your sewing machine that is called Quarter Inch Sewing Foot. This type of foot has a guide so that when your needle is in the correct position, you can line your fabric up with the guide on the foot and sew a perfect 1/4" seam without effort.
Here is the one I use. It came with my sewing machine.

That wraps it up for today :) If you have any questions, let me know!
Talk soon,
Jessica
Comments
Post a Comment