Riley Blake Designs Project Tour- Adel in Autumn

Hi, Everyone! Today I'm sharing the project I made for the Riley Blake Designs Project Tour for Adel in Autumn by Sandy Gervais.
I absolutely adore fall so when I saw this stunning fall collection, I knew I wanted to make something with it! I am a big fan of Sandy's fabric and her quilt patterns too. I love her design style and she comes up with really wonderful patterns to go with each of her collections. Here is a look at the prints in Adel in Autumn-

To see the patterns/projects that Sandy designed to coordinate her Adel in Autumn fabric. Click on the storyboard link and scroll to the last few pages of the PDF. All of the projects are gorgeous but I really love the sampler and the table runner. You can see the Storyboard for Adel in Autumn- here.
I knew right away that I wanted to make the Gratitude quilt from my book- Season to Taste: Quilts to Warm Your Home All Year Long.

Here is the original Gratitude quilt I made for the book-

Gratitude is in the 'Fall' section of the book. It measures 54 1/2" square. The large leaf has the saying, "There is always something to be grateful for" hand embroidered onto it. My original idea was to hand embroider a gratitude on each of the small leaves for the whole quilt top but, for the book, we went with leaving the small leaves blank. I'm still filing that idea of individual gratitudes for a future version of this quilt :)
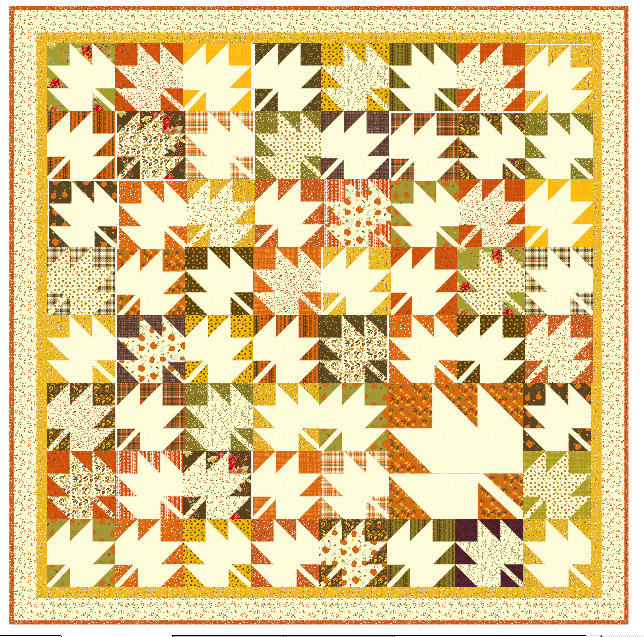
When I made this new version, I changed it up a little. You know I like making big quilts ;) so I upsized it. I made the center of the quilt 8 leaves by 8 leaves and I added two borders. After doing this, my new quilt measured 81 1/2" square.

I also changed the quote on the large leaf. This time, I hand embroidered, "Every leaf speaks bliss to me, Fluttering from the Autumn tree" by Emily Bronte.

The original quilt was a flannel and as such, you could not see the embroidery thread through the blocks. This time, I used regular quilting cotton. So, on the back of the large block, I used a fusible lightweight interfacing to give a little stability and also to help block out the little trails of my embroidery thread from showing through to the front.
Let me share the new fabric requirements with you so that you can make this larger version if you'd like to. For each leaf, you need 1 fat sixteenth of colored fabric and 1 fat eighth of background/light fabric (the large leaf needs a fat quarter of each). Knowing these amounts will help you make any size quilt you'd like here.
For the exact quilt I'm showing today, I used the following:
For the leaves-
Adel in Autumn fabric collection by Sandy Gervais for Riley Blake Designs
Texture by Sandy Gervais for Riley Blake Designs in the following colors: Vanilla (my main background color), Gold, Chocolate, Pumpkin, and Winter Pear
For the 1st border, Adel in Autumn Gold Vines (C10826-GOLD)
For the 2nd border, Adel in Autumn Cream Seeds (C10825-CREAM)
For the binding, Adel in Autumn Persimmon Seeds (C10825-PERSIMMON)
For the backing, Texture by Sandy Gervais for Riley Blake Designs in Chocolate
Here are the fabric requirements-
60 fat sixteenths of colored fabric
60 fat eighths of background/light fabric
1 fat quarter of colored fabric for the large leaf
1 fat quarter of background/light fabric for the large leaf
1/2 yard yellow print fabric for the 1st border (cut into 8- 2" x 42" strips)
7/8 yard low volume fabric for 2nd border (cut into 8- 3 1/2" x 42" strips)
5/8 yard binding fabric
5 yards backing* (*Note: if using standard width backing, the over hang on the sides of the quilt will be less than 2" on each side. If you'd like a bigger overhang, I would recommend using wide back fabric for the backing)
Cut and piece 60 small leaf blocks, as per the instructions in the Gratitude pattern of Season to Taste: Quilts to Warm Your Home All Year Long (pattern begins on page 39). Cut and piece one large leaf block. If desired, embroider a saying onto it. Lay out the blocks and sew them together in the shown below.
For border 1, sew the 8- 2" x 42" strips together end to end to make one long 2" strip. Cut two pieces that each measure 2" x 72 1/2" and sew these to the sides of the quilt. Cut two pieces that each measure 2" x 75 1/2" and sew these to the top and bottom of the quilt.
For border 2, sew the 8- 3 1/2" x 42" strips together end to end to make one long 3 1/2" strip. Cut two pieces that each measure 3 1/2" x 75 1/2" and sew these to the sides of the quilt. Cut two pieces that each measure 3 1/2" x 81 1/2" and sew these to the top and bottom of the quilt.
Baste, quilt, and bind using the 8- 2 1/2" x 42" strips.
Here is a look at my full quilt-

I'm so happy with how this quilt turned out! I hope you enjoyed this post and that I have inspired you. As always, thanks for following along!
Talk to you soon,
Jessica
Jessica
I really like fall colors too, and these fabrics are especially pretty. You chose a great pattern to showcase them. Pretty colorful falling fall leaves.
ReplyDeleteWonderful quilt!
ReplyDeleteThank you!
DeleteI love Autumn and Autumn colors, maybe because my birthday is in during Autumn!! Your quilt is beautiful!
ReplyDeleteThank you! I really love autumn and autumn colors also!
Delete